
Introduction
About the MIDI C6
The MIDI C6 controller is designed to simplify the control of one or several MIDI devices. It is fully configurable, which means you can customize it to your preferences. It has a total of 24 scenes that let you adapt the controller in many different ways.
The C6 controller buttons have a light ring that can be set to a custom color, with a selection of 15 colors available.
The C6 buttons can perform three types of actions: normal click, double click and long click. These actions are fully configurable: you choose which message to send and which color the light ring uses.
Each action of the Kowka MIDI C6 can be customized to send up to 5 MIDI messages with a single click. These MIDI messages can be sent on different channels of your choice, allowing you to control an unlimited number of devices with the C6.
The controller display is 3.2 inches and color, ensuring the controller information is visible even in low-light conditions, providing details about the current configuration of the device.
The C6 features MIDI OUT, USB, USB Host and Bluetooth outputs. These allow you to control devices that receive USB messages, control VSTs on a computer via the USB connection, as well as devices with host reception.
The C6 also has a MIDI IN input to receive MIDI messages, which can come from a MIDI OUT output or from the available USB outputs.
It is also possible to connect two external expression pedals or two external two-switch footswitches using the EXP1/CTRL1 and EXP2/CTRL2 outputs.
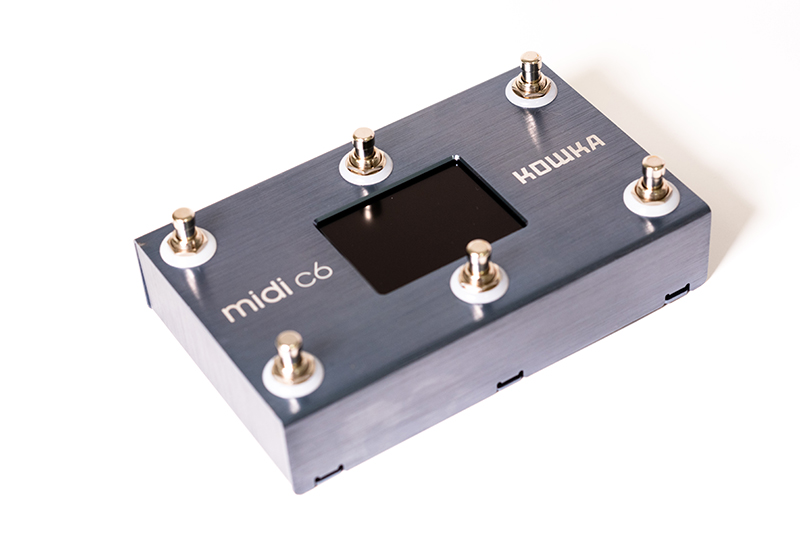
Connection options

The available connection options for the C6 are detailed below:
| Connection | Description |
| EXP1/CTRL1 | Allows connecting an external expression pedal, or an external footswitch via a TRS cable. |
| EXP2/CTRL2 | Allows connecting an external expression pedal, or an external footswitch via a TRS cable. |
| DC 9V | Controller power supply: 9V DC, 700 mA minimum. |
| USB | Connection to use the device with a computer. Requires external power. |
| HOST | Control of external pedals via the HOST option. |
| MIDI OUT | MIDI message output. |
| MIDI IN | MIDI message input. |
To use the controller with MIDI-cable devices, simply connect the power supply and the MIDI cable to the MIDI OUT output.
If you want to use it as a controller on your computer, use the USB connection.
To control devices via HOST, power the pedal with DC 9V and connect it with a USB cable to the HOST input.
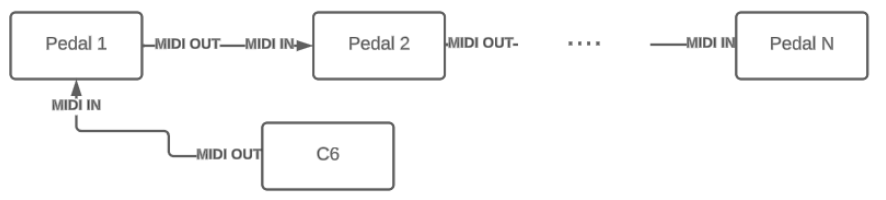
To control multiple devices with the C6 over a MIDI cable connection, you can daisy-chain them. Connect the MIDI OUT of the C6 to the first device, then connect the MIDI OUT of that device to the MIDI IN of the next one, and so on, as shown in the following image:
- Power supply included (9V DC)
- Standard instrument cable
- USB cable (for computer connection)
Device configuration
Opening the configuration app
Starting with firmware version 1.1.0, the Kowka MIDI C6 does not require installing any additional app or software. The complete configuration is done through the mobile app included with the controller.
To access this app, follow these steps:
- Go to the Main Menu of the controller by pressing buttons 3 and 4 at the same time.
- From the Menu, select option 4 «Setup unit from Wifi».
- Two QR codes will appear on the controller screen: one with the network information and another with the app access link.
- Connect your device to the «Kowka_C6_Wifi» WiFi network (password:
12345678). - Open the app by scanning the right QR code, or from your browser at http://appc6.local.
In seconds the software will be ready to configure your Kowka MIDI C6. You can use any device with WiFi connection.
If you have connection problems with the QR or the URL, use this direct address: http://192.168.1.21
Feature overview
The C6 has a total of 24 Scenes, each of which lets you save a complete controller configuration.
The following figure shows how each Scene is laid out.
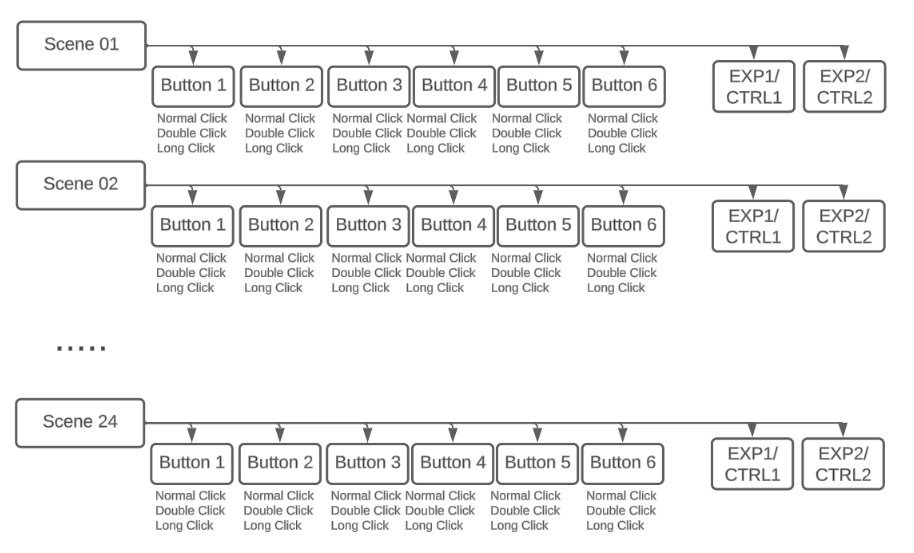
Each event (see the Glossary for details) inside the C6 can be configured with the following features:
- Custom event name with a maximum of 11 characters. This message is shown when the event runs.
- Event color among the 15 available colors.
- Ability to send up to 5 different messages. These MIDI messages can be sent on different channels, letting you change parameters on several devices at the same time.
When you send a MIDI message through the C6, it is transmitted via MIDI OUT, USB MIDI, Bluetooth MIDI and USB Host MIDI. On USB Host, the MIDI message is sent on MIDI channel 1.
Scenes
A scene in the C6 is a complete controller configuration, including the external expression pedals.
You can configure the scene with the following parameters:
- Scene name: each scene can have a specific name with a maximum of 11 characters.
- Ability to send 5 MIDI messages when loading a scene. These messages let you customize the different devices when this scene loads.
- Define the Program Change range the scene will move within. The values range between 0 and 127.
Global settings
The C6 controller offers several global configuration options for the whole device.
- Default MIDI channel: this selected channel will be used for sending all messages, although you can choose other channels to send MIDI messages. This channel is also shown on the controller screen along with its current Program Change (PC) value.
- Default scene: this is the scene that loads automatically when the controller powers on.
- Maximum number of scenes: you can adjust the maximum number of available scenes to your needs. If you only need 4 scenes, there is no need to have all 24 scenes available on the controller.
External footswitches
The MIDI C6 controller allows the use of 2 external expression pedals or 2 external footswitches, or one external expression pedal and one external footswitch.
To use these devices, you must enable them in the specific scene through the configuration app. You can select whether to enable the expression pedal, the footswitch, or keep them disabled.
Footswitch
The footswitch must be a two-button model with momentary (non-latching) switches. Connect it with a TRS signal cable.
The external footswitch has the same features as the C6 buttons, with normal click, double click and long click events, as well as the ability to assign a custom color and message.
Expression pedal
The C6 supports the use of one or two expression pedals. The connection must be made using a TRS signal cable. To calibrate the expression pedal, see the Expression pedal calibration section.
Expression pedal calibration
Enter the Kowka MIDI C6 settings menu by pressing buttons 3 and 4 at the same time.
Choose the option you prefer:
- To calibrate expression pedal EXP / CTRL 1, press button 2) Calibrate expression Pedal#1
- To calibrate expression pedal EXP / CTRL 2, press button 3) Calibrate expression Pedal#2
Connect the expression pedal to the corresponding input using a TRS cable.
Place the expression pedal at the minimum position (heel down, full weight on the heel). When at minimum, press button 1 on the device to set the MIN parameter.
Place the expression pedal at the maximum position (toe down, full weight on the toes). When at maximum, press button 1 on the device to set the MAX parameter.
If the calibration was successful, a confirmation message appears. If it failed, an error message appears — try the process again.
Host
The C6 includes a Host connection to control devices that do not automatically support USB OTG. Some of the devices with this option are:
- Zoom MS-50G
- Zoom G1xon
- Hotone Ampero MINI
- Hotone Ampero
- Any other device with a USB Host connection
To make the connection:
- Make sure the device is powered off before connecting it.
- Connect a USB cable from the «Host» output of the C6 to the device you want to control.
- Once connected, power on the C6 first and then the device you want to control.
Appendices
Glossary
Here is the glossary of terms used in this manual:
Click Normal: Pressing the footswitch once.
Click Doble: Pressing the footswitch twice. The interval between presses must be under 500 ms; otherwise the controller interprets two normal clicks.
Click Largo: Holding the footswitch pressed for more than 600 ms.
Escena: Complete controller configuration, including the events assigned to the controller buttons and the configured external expression pedals and/or footswitches.
Evento: Type of action a controller footswitch can execute. The C6 has 3 different events.
Mensaje: MIDI instruction sent, or action within the controller. It can be a Program Change, Control Change, Note On, Note Off message or a scene change.
Firmware update
To update the firmware you will need a USB-C cable to connect directly to a computer. This lets you install new firmware versions with new features.
The steps are the following:
- Download the latest firmware version from kowka.com/downloads. On that page you can get the latest available firmware version.
- Unzip the firmware file into a folder for later installation on the Kowka MIDI C6.
- With the device disconnected from its power source and/or USB power, hold down button 4 on the controller and, without releasing it, connect the USB cable to the computer. If done correctly, button 4 of the Kowka MIDI C6 will be green and a new drive named “Kowka-C6” will open.
- After opening the “Kowka-C6” drive, copy the downloaded file into it. When the copy finishes, the new firmware will be installed automatically.
Once the copy finishes, the Kowka MIDI C6 will install the new firmware and restart automatically. Remember to validate the installation on the home screen, where the controller firmware version is shown.
How to factory reset your device
To restore your Kowka MIDI C6 to the factory settings, follow these steps:
- Turn off your device and disconnect it from the power supply.
- Hold down button 1 of your Kowka MIDI C6 (the bottom left button).
- Without releasing the button, connect your device to the power supply.
- Wait a few minutes while the factory reset takes place.
- Once the process finishes, the device will restart with the factory parameters.